
MVC 프로젝트 만들기
- [file] -> [New] -> [Spring Legacy Project] 클릭

- [project name]에는 생성하고자 하는 프로젝트의 이름을 입력
- [Templates] -> [Persistence] -> [Spring MVC Project] 클릭
- [Next] 클릭
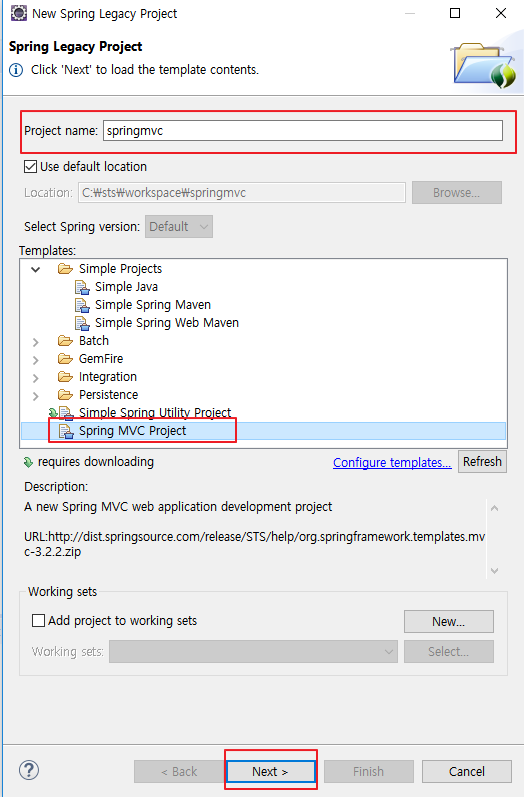
- [Finish]를 클릭하면, MVC 프로젝트가 생성이 된다.

- 아래 소스는 [Web.xml]인데, 톰켓이 실행이 되고 url 요청이 들어오면, 서블릿 매핑에 의해 그 요청을 처리하고,
첫 번째로는 [servlet-context.xml]을 로드하고, 두 번째로 [root-context.xml]을 로드하게 된다.
<?xml version="1.0" encoding="UTF-8"?>
<web-app version="2.5" xmlns="http://java.sun.com/xml/ns/javaee"
	xmlns:xsi="http://www.w3.org/2001/XMLSchema-instance"
	xsi:schemaLocation="http://java.sun.com/xml/ns/javaee https://java.sun.com/xml/ns/javaee/web-app_2_5.xsd">

	<!-- The definition of the Root Spring Container shared by all Servlets and Filters -->
	<context-param>
		<param-name>contextConfigLocation</param-name>
		<param-value>/WEB-INF/spring/root-context.xml</param-value>
	</context-param>

	<!-- Creates the Spring Container shared by all Servlets and Filters -->
	<listener>
		<listener-class>org.springframework.web.context.ContextLoaderListener</listener-class>
	</listener>

	<!-- Processes application requests -->
	<servlet>
		<servlet-name>appServlet</servlet-name>
		<servlet-class>org.springframework.web.servlet.DispatcherServlet</servlet-class>
		<init-param>
			<param-name>contextConfigLocation</param-name>
			<param-value>/WEB-INF/spring/appServlet/servlet-context.xml</param-value>
		</init-param>
		<load-on-startup>1</load-on-startup>
	</servlet>

	<servlet-mapping>
		<servlet-name>appServlet</servlet-name>
		<url-pattern>/</url-pattern>
	</servlet-mapping>

</web-app>
- [servlet-context.xml]의 소스에 아래와 같이 context태그를 추가하는데,이 태그를 추가하는 이유는어노테이션을 쓸
수 있게 하기위함이다.
<?xml version="1.0" encoding="UTF-8"?>
<beans:beans xmlns="http://www.springframework.org/schema/mvc"
	xmlns:xsi="http://www.w3.org/2001/XMLSchema-instance"
	xmlns:beans="http://www.springframework.org/schema/beans"
	xmlns:context="http://www.springframework.org/schema/context"
	xsi:schemaLocation="http://www.springframework.org/schema/mvc https://www.springframework.org/schema/mvc/spring-mvc.xsd
		http://www.springframework.org/schema/beans https://www.springframework.org/schema/beans/spring-beans.xsd
		http://www.springframework.org/schema/context https://www.springframework.org/schema/context/spring-context.xsd">

	<!-- DispatcherServlet Context: defines this servlet's request-processing infrastructure -->

	<!-- Enables the Spring MVC @Controller programming model -->
	<annotation-driven />

	<!-- Handles HTTP GET requests for /resources/** by efficiently serving up static resources in the ${webappRoot}/resources directory -->
	<resources mapping="/resources/**" location="/resources/" />

	<!-- Resolves views selected for rendering by @Controllers to .jsp resources in the /WEB-INF/views directory -->
	<beans:bean class="org.springframework.web.servlet.view.InternalResourceViewResolver">
		<beans:property name="prefix" value="/WEB-INF/views/" />
		<beans:property name="suffix" value=".jsp" />
	</beans:bean>

	<context:component-scan base-package="com.sts.example" use-default-filters="false">
		<context:include-filter type="annotation" expression="org.springframework.stereotype.Controller"/>
	</context:component-scan>


</beans:beans>
- 그리고 [root-context.xml]에 Namespace로 context를 추가해준 다음 아래와 같이 작성한다.
<?xml version="1.0" encoding="UTF-8"?>
<beans xmlns="http://www.springframework.org/schema/beans"
	xmlns:xsi="http://www.w3.org/2001/XMLSchema-instance"
	xmlns:context="http://www.springframework.org/schema/context"
	xsi:schemaLocation="http://www.springframework.org/schema/beans https://www.springframework.org/schema/beans/spring-beans.xsd
		http://www.springframework.org/schema/context http://www.springframework.org/schema/context/spring-context-3.1.xsd">

	<!-- Root Context: defines shared resources visible to all other web components -->

		<!-- Root Context: defines shared resources visible to all other web components -->

	<context:component-scan base-package="com.sts.example" use-default-filters="false">
		<context:exclude-filter type="annotation" expression="org.springframework.stereotype.Controller"/>
	</context:component-scan>

	<context:component-scan base-package="com.sts.example" use-default-filters="false">
		<context:include-filter type="annotation" expression="org.springframework.stereotype.Service"/>
		<context:include-filter type="annotation" expression="org.springframework.stereotype.Repository"/>
	</context:component-scan>

	<!-- Root Context: defines shared resources visible to all other web components -->
	<import resource="classpath:/config/spring/context/context-datasource.xml"/>
	<import resource="classpath:/config/spring/context/context-mybatis.xml" />


</beans>
- [src/main/resources] 디렉토리 아래 config-spring-context순으로 디렉토리를 만들어 주었고,
- 방금 만든 디렉토리 아래 [context-datasource.xml]파일과 [context-mybatis.xml]파일을 만들어 주었다.
- 이 2개의 파일 경로는 바로 위 소스의 inport 경로와 맞춰주기 위함이다.

- [context-datasource.xml]파일에 아래와같이 소스를 작성하는데, 나는 MySql DB를 사용하므로 그 형식에
맞춰서 작성하였다. bean->property의 url에는 자신의 DB 호스트 주소를, username에는 아이디를 적고
password에는 비밀번호를 적으면 된다
<?xml version="1.0" encoding="UTF-8"?>
<beans xmlns="http://www.springframework.org/schema/beans"
	xmlns:xsi="http://www.w3.org/2001/XMLSchema-instance"
	xmlns:jdbc="http://www.springframework.org/schema/jdbc"
    xsi:schemaLocation="http://www.springframework.org/schema/jdbc
		http://www.springframework.org/schema/jdbc/spring-jdbc-4.3.xsd
		http://www.springframework.org/schema/beans
		http://www.springframework.org/schema/beans/spring-beans.xsd">

		<bean id="dataSource" class="org.springframework.jdbc.datasource.DriverManagerDataSource">
			<property name="driverClassName" value="com.mysql.cj.jdbc.Driver" />
			<property name="url" value="DB 호스트 주소" />
			<property name="username" value="user ID" />
			<property name="password" value="user password" />
		</bean>
	</beans>
- [context-mybatis.xml]파일에는 아래와같이 소스를 작성
<?xml version="1.0" encoding="UTF-8"?>
	<beans xmlns="http://www.springframework.org/schema/beans"
	xmlns:xsi="http://www.w3.org/2001/XMLSchema-instance"
	xmlns:util="http://www.springframework.org/schema/util"
	xmlns:context="http://www.springframework.org/schema/context"
	xmlns:p="http://www.springframework.org/schema/p"
	xsi:schemaLocation="http://www.springframework.org/schema/beans http://www.springframework.org/schema/beans/spring-beans-3.1.xsd http://www.springframework.org/schema/util http://www.springframework.org/schema/util/spring-util-3.1.xsd http://www.springframework.org/schema/context http://www.springframework.org/schema/context/spring-context-3.1.xsd">


		<bean id="sqlSessionFactory" class="org.mybatis.spring.SqlSessionFactoryBean">
			<property name="dataSource" ref="dataSource" />
			<property name="configLocation" value="classpath:/config/spring/context/mybatis-config-base.xml" />
			<property name="mapperLocations">
				<list>
					<value>classpath:mapper/*Mapper.xml</value>
				</list>
			</property>
		</bean>

		<!-- SQLSessionTemplate설정하기 DAO인터페이스를 만들었기때문에 Mybatis에서 DAO인터페이스를 구현하기위해서 필요한작업 -->

	    <bean id="sqlSession" class="org.mybatis.spring.SqlSessionTemplate" destroy-method="clearCache">
	        <constructor-arg name="sqlSessionFactory" ref="sqlSessionFactory"></constructor-arg>
	    </bean>

	</beans>
- [mybatis-config-base.xml]파일에는 아래와 같은 내용이 있는데, 자신에게 맞게 추가하거나 삭제하면서 쓴다
<?xml version="1.0" encoding="UTF-8" ?> <!DOCTYPE configuration PUBLIC "-//mybatis.org//DTD Config 3.0//EN" "http://mybatis.org/dtd/mybatis-3-config.dtd">
<configuration>
	<settings>
		<setting name="cacheEnabled" value="true" />
		<setting name="lazyLoadingEnabled" value="false" />
		<setting name="multipleResultSetsEnabled" value="true" />
		<setting name="useColumnLabel" value="true" />
		<setting name="useGeneratedKeys" value="false" />
		<setting name="defaultExecutorType" value="SIMPLE" />
		<setting name="defaultStatementTimeout" value="25000" />
	</settings>
	<typeHandlers> <!-- java.sql.Timestamp 를 java.util.Date 형으로 반환 -->
		<typeHandler javaType="java.sql.Timestamp"
			handler="org.apache.ibatis.type.DateTypeHandler" />
		<typeHandler javaType="java.sql.Time"
			handler="org.apache.ibatis.type.DateTypeHandler" />
		<typeHandler javaType="java.sql.Date"
			handler="org.apache.ibatis.type.DateTypeHandler" />
	</typeHandlers>
</configuration>
- 마지막으로 [src/main/resources]아래 [mapper] 디렉토리를 만들어주고, [context-mybatis.xml]에서 설정
해 준 mapper의 주소 체계에 따라 *Mapper.xml로 된 파일을 만들어 준다.

- [BoardMapper.xml] 파일의 쿼리내용
- resultMap은 내가 type으로 지정해준 VO 클래스의 필드들을 매칭시켜주는 역할을 한다.
<?xml version="1.0" encoding="UTF-8"?>

<!DOCTYPE mapper
  PUBLIC "-//mybatis.org//DTD Mapper 3.0//EN"
  "http://mybatis.org/dtd/mybatis-3-mapper.dtd">


<mapper namespace="com.sts.example.BoardMapper">

	<resultMap id="boardMap" type="com.sts.example.domain.BoardVO">
		<id 	property="index" column="index"/>
		<result property="user_index" column="user_index"/>
		<result property="title" column="title"/>
		<result property="sub_title" column="sub_title"/>
		<result property="content" column="content"/>
		<result property="board_type" column="board_type"/>
		<result property="created_date" column="created_date"/>
		<result property="updated_date" column="updated_date"/>
	</resultMap>

    <select id="select" resultMap="boardMap">
    	SELECT * FROM board;
    </select>

</mapper>- type에 들어가는 VO클래스를 만들어주자

- [BoardVO.java]
- 아래의 소스는 Getter,Setter를 직접 만들어 줬는데, lombok 디펜던시를 받으면 소스가 단순해진다.
package com.sts.example.domain;

import java.time.LocalDateTime;

public class BoardVO {

	int index;
	int user_index;

	String title;
	String sub_title;
	String content;
	String board_type;
	LocalDateTime created_date;
	LocalDateTime updated_date;


	public int getIndex() {
		return index;
	}
	public void setIndex(int index) {
		this.index = index;
	}
	public String getTitle() {
		return title;
	}
	public void setTitle(String title) {
		this.title = title;
	}
	public String getSub_title() {
		return sub_title;
	}
	public void setSub_title(String sub_title) {
		this.sub_title = sub_title;
	}
	public String getContent() {
		return content;
	}
	public void setContent(String content) {
		this.content = content;
	}
	public String getBoard_type() {
		return board_type;
	}
	public void setBoard_type(String board_type) {
		this.board_type = board_type;
	}
	public LocalDateTime getCreated_date() {
		return created_date;
	}
	public void setCreated_date(LocalDateTime created_date) {
		this.created_date = created_date;
	}
	public LocalDateTime getUpdated_date() {
		return updated_date;
	}
	public void setUpdated_date(LocalDateTime updated_date) {
		this.updated_date = updated_date;
	}
	public int getUser_index() {
		return user_index;
	}
	public void setUser_index(int user_index) {
		this.user_index = user_index;
	}


}
'Spring Framework > spring' 카테고리의 다른 글
| 스프링 tiles(타일즈) 설정하기 (0) | 2019.08.12 |
|---|---|
| 스프링 MVC 설정으로 게시판 만들기 Part_2 (1) | 2019.08.09 |
| 스프링 프로젝트 - 트랜잭션 Part_2 (0) | 2019.08.08 |
| 스프링 프로젝트 - 트랜잭션 설정 Part_1 (1) | 2019.08.08 |
| 처음 시작하는 스프링 프로젝트 (1) | 2019.08.08 |
MVC 프로젝트 만들기
- [file] -> [New] -> [Spring Legacy Project] 클릭
- [project name]에는 생성하고자 하는 프로젝트의 이름을 입력
- [Templates] -> [Persistence] -> [Spring MVC Project] 클릭
- [Next] 클릭
- [Finish]를 클릭하면, MVC 프로젝트가 생성이 된다.
- 아래 소스는 [Web.xml]인데, 톰켓이 실행이 되고 url 요청이 들어오면, 서블릿 매핑에 의해 그 요청을 처리하고,
첫 번째로는 [servlet-context.xml]을 로드하고, 두 번째로 [root-context.xml]을 로드하게 된다.
<?xml version="1.0" encoding="UTF-8"?>
<web-app version="2.5" xmlns="http://java.sun.com/xml/ns/javaee"
	xmlns:xsi="http://www.w3.org/2001/XMLSchema-instance"
	xsi:schemaLocation="http://java.sun.com/xml/ns/javaee https://java.sun.com/xml/ns/javaee/web-app_2_5.xsd">

	<!-- The definition of the Root Spring Container shared by all Servlets and Filters -->
	<context-param>
		<param-name>contextConfigLocation</param-name>
		<param-value>/WEB-INF/spring/root-context.xml</param-value>
	</context-param>

	<!-- Creates the Spring Container shared by all Servlets and Filters -->
	<listener>
		<listener-class>org.springframework.web.context.ContextLoaderListener</listener-class>
	</listener>

	<!-- Processes application requests -->
	<servlet>
		<servlet-name>appServlet</servlet-name>
		<servlet-class>org.springframework.web.servlet.DispatcherServlet</servlet-class>
		<init-param>
			<param-name>contextConfigLocation</param-name>
			<param-value>/WEB-INF/spring/appServlet/servlet-context.xml</param-value>
		</init-param>
		<load-on-startup>1</load-on-startup>
	</servlet>

	<servlet-mapping>
		<servlet-name>appServlet</servlet-name>
		<url-pattern>/</url-pattern>
	</servlet-mapping>

</web-app>
- [servlet-context.xml]의 소스에 아래와 같이 context태그를 추가하는데,이 태그를 추가하는 이유는어노테이션을 쓸
수 있게 하기위함이다.
<?xml version="1.0" encoding="UTF-8"?>
<beans:beans xmlns="http://www.springframework.org/schema/mvc"
	xmlns:xsi="http://www.w3.org/2001/XMLSchema-instance"
	xmlns:beans="http://www.springframework.org/schema/beans"
	xmlns:context="http://www.springframework.org/schema/context"
	xsi:schemaLocation="http://www.springframework.org/schema/mvc https://www.springframework.org/schema/mvc/spring-mvc.xsd
		http://www.springframework.org/schema/beans https://www.springframework.org/schema/beans/spring-beans.xsd
		http://www.springframework.org/schema/context https://www.springframework.org/schema/context/spring-context.xsd">

	<!-- DispatcherServlet Context: defines this servlet's request-processing infrastructure -->

	<!-- Enables the Spring MVC @Controller programming model -->
	<annotation-driven />

	<!-- Handles HTTP GET requests for /resources/** by efficiently serving up static resources in the ${webappRoot}/resources directory -->
	<resources mapping="/resources/**" location="/resources/" />

	<!-- Resolves views selected for rendering by @Controllers to .jsp resources in the /WEB-INF/views directory -->
	<beans:bean class="org.springframework.web.servlet.view.InternalResourceViewResolver">
		<beans:property name="prefix" value="/WEB-INF/views/" />
		<beans:property name="suffix" value=".jsp" />
	</beans:bean>

	<context:component-scan base-package="com.sts.example" use-default-filters="false">
		<context:include-filter type="annotation" expression="org.springframework.stereotype.Controller"/>
	</context:component-scan>


</beans:beans>
- 그리고 [root-context.xml]에 Namespace로 context를 추가해준 다음 아래와 같이 작성한다.
<?xml version="1.0" encoding="UTF-8"?>
<beans xmlns="http://www.springframework.org/schema/beans"
	xmlns:xsi="http://www.w3.org/2001/XMLSchema-instance"
	xmlns:context="http://www.springframework.org/schema/context"
	xsi:schemaLocation="http://www.springframework.org/schema/beans https://www.springframework.org/schema/beans/spring-beans.xsd
		http://www.springframework.org/schema/context http://www.springframework.org/schema/context/spring-context-3.1.xsd">

	<!-- Root Context: defines shared resources visible to all other web components -->

		<!-- Root Context: defines shared resources visible to all other web components -->

	<context:component-scan base-package="com.sts.example" use-default-filters="false">
		<context:exclude-filter type="annotation" expression="org.springframework.stereotype.Controller"/>
	</context:component-scan>

	<context:component-scan base-package="com.sts.example" use-default-filters="false">
		<context:include-filter type="annotation" expression="org.springframework.stereotype.Service"/>
		<context:include-filter type="annotation" expression="org.springframework.stereotype.Repository"/>
	</context:component-scan>

	<!-- Root Context: defines shared resources visible to all other web components -->
	<import resource="classpath:/config/spring/context/context-datasource.xml"/>
	<import resource="classpath:/config/spring/context/context-mybatis.xml" />


</beans>
- [src/main/resources] 디렉토리 아래 config-spring-context순으로 디렉토리를 만들어 주었고,
- 방금 만든 디렉토리 아래 [context-datasource.xml]파일과 [context-mybatis.xml]파일을 만들어 주었다.
- 이 2개의 파일 경로는 바로 위 소스의 inport 경로와 맞춰주기 위함이다.
- [context-datasource.xml]파일에 아래와같이 소스를 작성하는데, 나는 MySql DB를 사용하므로 그 형식에
맞춰서 작성하였다. bean->property의 url에는 자신의 DB 호스트 주소를, username에는 아이디를 적고
password에는 비밀번호를 적으면 된다
<?xml version="1.0" encoding="UTF-8"?>
<beans xmlns="http://www.springframework.org/schema/beans"
	xmlns:xsi="http://www.w3.org/2001/XMLSchema-instance"
	xmlns:jdbc="http://www.springframework.org/schema/jdbc"
    xsi:schemaLocation="http://www.springframework.org/schema/jdbc
		http://www.springframework.org/schema/jdbc/spring-jdbc-4.3.xsd
		http://www.springframework.org/schema/beans
		http://www.springframework.org/schema/beans/spring-beans.xsd">

		<bean id="dataSource" class="org.springframework.jdbc.datasource.DriverManagerDataSource">
			<property name="driverClassName" value="com.mysql.cj.jdbc.Driver" />
			<property name="url" value="DB 호스트 주소" />
			<property name="username" value="user ID" />
			<property name="password" value="user password" />
		</bean>
	</beans>
- [context-mybatis.xml]파일에는 아래와같이 소스를 작성
<?xml version="1.0" encoding="UTF-8"?>
	<beans xmlns="http://www.springframework.org/schema/beans"
	xmlns:xsi="http://www.w3.org/2001/XMLSchema-instance"
	xmlns:util="http://www.springframework.org/schema/util"
	xmlns:context="http://www.springframework.org/schema/context"
	xmlns:p="http://www.springframework.org/schema/p"
	xsi:schemaLocation="http://www.springframework.org/schema/beans http://www.springframework.org/schema/beans/spring-beans-3.1.xsd http://www.springframework.org/schema/util http://www.springframework.org/schema/util/spring-util-3.1.xsd http://www.springframework.org/schema/context http://www.springframework.org/schema/context/spring-context-3.1.xsd">


		<bean id="sqlSessionFactory" class="org.mybatis.spring.SqlSessionFactoryBean">
			<property name="dataSource" ref="dataSource" />
			<property name="configLocation" value="classpath:/config/spring/context/mybatis-config-base.xml" />
			<property name="mapperLocations">
				<list>
					<value>classpath:mapper/*Mapper.xml</value>
				</list>
			</property>
		</bean>

		<!-- SQLSessionTemplate설정하기 DAO인터페이스를 만들었기때문에 Mybatis에서 DAO인터페이스를 구현하기위해서 필요한작업 -->

	    <bean id="sqlSession" class="org.mybatis.spring.SqlSessionTemplate" destroy-method="clearCache">
	        <constructor-arg name="sqlSessionFactory" ref="sqlSessionFactory"></constructor-arg>
	    </bean>

	</beans>
- [mybatis-config-base.xml]파일에는 아래와 같은 내용이 있는데, 자신에게 맞게 추가하거나 삭제하면서 쓴다
<?xml version="1.0" encoding="UTF-8" ?> <!DOCTYPE configuration PUBLIC "-//mybatis.org//DTD Config 3.0//EN" "http://mybatis.org/dtd/mybatis-3-config.dtd">
<configuration>
	<settings>
		<setting name="cacheEnabled" value="true" />
		<setting name="lazyLoadingEnabled" value="false" />
		<setting name="multipleResultSetsEnabled" value="true" />
		<setting name="useColumnLabel" value="true" />
		<setting name="useGeneratedKeys" value="false" />
		<setting name="defaultExecutorType" value="SIMPLE" />
		<setting name="defaultStatementTimeout" value="25000" />
	</settings>
	<typeHandlers> <!-- java.sql.Timestamp 를 java.util.Date 형으로 반환 -->
		<typeHandler javaType="java.sql.Timestamp"
			handler="org.apache.ibatis.type.DateTypeHandler" />
		<typeHandler javaType="java.sql.Time"
			handler="org.apache.ibatis.type.DateTypeHandler" />
		<typeHandler javaType="java.sql.Date"
			handler="org.apache.ibatis.type.DateTypeHandler" />
	</typeHandlers>
</configuration>
- 마지막으로 [src/main/resources]아래 [mapper] 디렉토리를 만들어주고, [context-mybatis.xml]에서 설정
해 준 mapper의 주소 체계에 따라 *Mapper.xml로 된 파일을 만들어 준다.
- [BoardMapper.xml] 파일의 쿼리내용
- resultMap은 내가 type으로 지정해준 VO 클래스의 필드들을 매칭시켜주는 역할을 한다.
<?xml version="1.0" encoding="UTF-8"?>

<!DOCTYPE mapper
  PUBLIC "-//mybatis.org//DTD Mapper 3.0//EN"
  "http://mybatis.org/dtd/mybatis-3-mapper.dtd">


<mapper namespace="com.sts.example.BoardMapper">

	<resultMap id="boardMap" type="com.sts.example.domain.BoardVO">
		<id 	property="index" column="index"/>
		<result property="user_index" column="user_index"/>
		<result property="title" column="title"/>
		<result property="sub_title" column="sub_title"/>
		<result property="content" column="content"/>
		<result property="board_type" column="board_type"/>
		<result property="created_date" column="created_date"/>
		<result property="updated_date" column="updated_date"/>
	</resultMap>

    <select id="select" resultMap="boardMap">
    	SELECT * FROM board;
    </select>

</mapper>
- type에 들어가는 VO클래스를 만들어주자
- [BoardVO.java]
- 아래의 소스는 Getter,Setter를 직접 만들어 줬는데, lombok 디펜던시를 받으면 소스가 단순해진다.
package com.sts.example.domain;

import java.time.LocalDateTime;

public class BoardVO {

	int index;
	int user_index;

	String title;
	String sub_title;
	String content;
	String board_type;
	LocalDateTime created_date;
	LocalDateTime updated_date;


	public int getIndex() {
		return index;
	}
	public void setIndex(int index) {
		this.index = index;
	}
	public String getTitle() {
		return title;
	}
	public void setTitle(String title) {
		this.title = title;
	}
	public String getSub_title() {
		return sub_title;
	}
	public void setSub_title(String sub_title) {
		this.sub_title = sub_title;
	}
	public String getContent() {
		return content;
	}
	public void setContent(String content) {
		this.content = content;
	}
	public String getBoard_type() {
		return board_type;
	}
	public void setBoard_type(String board_type) {
		this.board_type = board_type;
	}
	public LocalDateTime getCreated_date() {
		return created_date;
	}
	public void setCreated_date(LocalDateTime created_date) {
		this.created_date = created_date;
	}
	public LocalDateTime getUpdated_date() {
		return updated_date;
	}
	public void setUpdated_date(LocalDateTime updated_date) {
		this.updated_date = updated_date;
	}
	public int getUser_index() {
		return user_index;
	}
	public void setUser_index(int user_index) {
		this.user_index = user_index;
	}


}
'Spring Framework > spring' 카테고리의 다른 글
| 스프링 tiles(타일즈) 설정하기 (0) | 2019.08.12 |
|---|---|
| 스프링 MVC 설정으로 게시판 만들기 Part_2 (1) | 2019.08.09 |
| 스프링 프로젝트 - 트랜잭션 Part_2 (0) | 2019.08.08 |
| 스프링 프로젝트 - 트랜잭션 설정 Part_1 (1) | 2019.08.08 |
| 처음 시작하는 스프링 프로젝트 (1) | 2019.08.08 |